

Programming tutorials shows us a land of promise where everything happens as you think; as soon as you think. But real world doesn’t work that way most of the times. Here; you spend hours debugging some CORS error or thinking why your database table Id column is not auto-incrementing. For the last 2 days; I am participating in a coding interview which spans 2 days and these series of blog is based on that experience – what am I thinking at each stage; what is the issue and how I am resolving them. This is the fifth part of that.
Adding Authentication and Authorization
We installed the following nuget packages –
- Microsoft.EntityFrameworkCore.SqlServer
- Microsoft.EntityFrameworkCore.Tools
- Microsoft.AspNetCore.Identity.EntityFrameworkCore
- Microsoft.AspNetCore.Identity
- Microsoft.AspNetCore.Authentication.JwtBearer
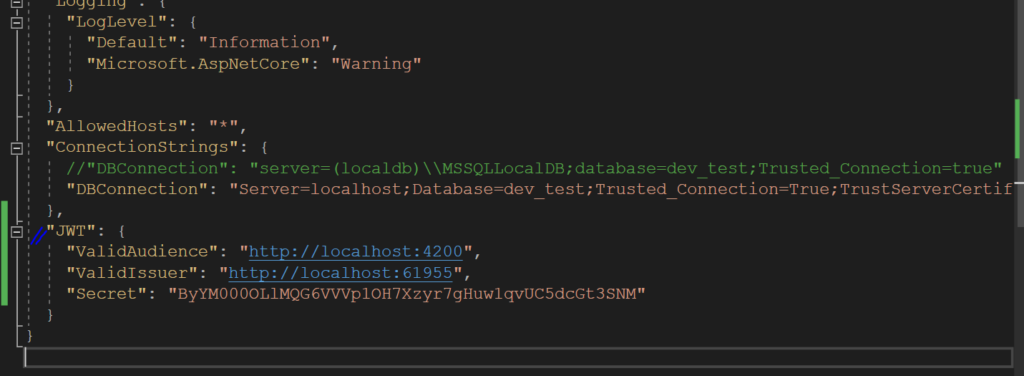
Added JWT configuration in appsettings.json as such –
Modified the User class signature as such – public class User: IdentityUser
Then modified the database context class as below:
using dev_test.DTOs;
using Microsoft.EntityFrameworkCore;
using Microsoft.AspNet.Identity.EntityFramework;
namespace dev_test
{
    public class DatabaseContext : IdentityDbContext<User>
    {
        public DatabaseContext(DbContextOptions<DatabaseContext> options) : base(options){}
        protected override void OnModelCreating(ModelBuilder builder)
        {
            base.OnModelCreating(builder);
        }
        public DbSet<User> User { get; set; }
        public DbSet<Survey> Survey { get; set; }
        public DbSet<Question> Question { get; set; }
        public DbSet<Answer> Answer { get; set; }
    }
}
After that; we are running into an error. The type 'dev_test.DTOs.User' cannot be used as type parameter 'TUser' in the generic type or method 'IdentityDbContext'. There is no implicit reference conversion from 'dev_test.DTOs.User' to 'Microsoft.AspNet.Identity.EntityFramework.IdentityUser'
Changing our using section in database context to –
using dev_test.DTOs;
using Microsoft.AspNetCore.Identity.EntityFrameworkCore;
using Microsoft.EntityFrameworkCore;
Fixes the problem. Turns out; I was using EntityFramework instead of EntityFrameworkCore of Identity. The main difference is that Microsoft.AspNetCore.Identity.EntityFrameworkCore is built for and runs on .NET Core, while Microsoft.AspNet.Identity.EntityFramework is built for and runs on the full .NET framework. Additionally, Microsoft.AspNetCore.Identity.EntityFrameworkCore is more lightweight and optimized for performance compared to Microsoft.AspNet.Identity.EntityFramework.
We then proceeded to follow instructions from here – https://www.c-sharpcorner.com/article/authentication-and-authorization-in-asp-net-core-web-api-with-json-web-tokens/
And when we run the application; we are greeted with the error message – System.InvalidOperationException: Unable to resolve service for type 'Microsoft.AspNetCore.Identity.UserManager`1[dev_test.DTOs.User]' while attempting to activate 'dev_test.Controllers.AuthenticateController'. in swagger prompt.
We then get an error – Unable to resolve service for type 'Microsoft.AspNetCore.Identity.IUserStore1[dev_test.DTOs.User]' while attempting to activate 'Microsoft.AspNetCore.Identity.UserManager1[dev_test.DTOs.User]'. when we add the following line in program.cs – builder.Services.AddIdentity();
Which is not correct also. In fact; it’s giving some more issues.
Removed this line and added app.UseIdentity(); in Program.cs. Getting error – webapplication does not contain a definition for useidentity.
After few trial and error; we realized that instead of adding – builder.Services.AddIdentity();
We should have added – builder.Services.AddIdentity()
.AddEntityFrameworkStores()
.AddDefaultTokenProviders();
The code for Program.cs look like this now –
using Microsoft.EntityFrameworkCore;
using dev_test;
using dev_test.Repositories.Contracts;
using dev_test.Services.Contracts;
using dev_test.Services;
using dev_test.DTOs;
using Microsoft.AspNetCore.Identity;
using System;
var builder = WebApplication.CreateBuilder(args);
var connectionString = builder.Configuration.GetConnectionString("DBConnection");
builder.Services.AddDbContext<DatabaseContext>(x => x.UseSqlServer(connectionString));
builder.Services.AddIdentity<User, IdentityRole>()
            .AddEntityFrameworkStores<DatabaseContext>()
            .AddDefaultTokenProviders();
builder.Services.AddScoped<IUserRepository, UserRepository>();
builder.Services.AddScoped<IUserService, UserService>();
builder.Services.AddScoped<ISurveyRepository, SurveyRepository>();
builder.Services.AddScoped<ISurveyService, SurveyService>();
builder.Services.AddCors();
builder.Services.AddControllers();
builder.Services.AddEndpointsApiExplorer();
builder.Services.AddSwaggerGen();
var app = builder.Build();
if (app.Environment.IsDevelopment())
{
    app.UseSwagger();
    app.UseSwaggerUI();
}
app.UseCors(builder => builder
     .AllowAnyOrigin()
     .AllowAnyMethod()
     .AllowAnyHeader());

app.UseHttpsRedirection();
app.UseAuthentication();
app.UseAuthorization();
app.MapControllers();
app.Run();
What finally worked is that asp.net identity needs it’s own database tables; like these –

I ran dotnet ef migrations add AddedEFCoreTables followed by dotnet ef database update. This added the SQL tables needed for user authentication with ASP.NET Core Identity and EF Core.
But as my User table has column name and AspNetUsers has Username; it can’t map to it.
At this point; we are postponing the authentication and authorization as we couldn’t fix it. We will come back to this issue later.

Attempt 2
It’s a beautiful day and we are back at it again. After some research and studying; I have found that there are 2 approaches; both uses JWT.
In approach 1; they used UserManager, RoleManager and UserManager<ApplicationUser>, it required user model to be migrated and creation of AspNetUserLogins, AspNetUserClaims etc table.
In approach 2; they used none of this. When user posted their user name and password; it created an Jwt token and send to callee. And it gets all info from this token in subsequent calls.
Approach 1 uses ASP.NET Core Identity, which is a built-in framework for handling user authentication and authorization in ASP.NET Core applications. This approach requires setting up and managing user and role tables (such as AspNetUserLogins, AspNetUserClaims). It also requires creating and storing user information in a database.
Approach 2 is a simpler approach, which generates a JWT token and sends it to the caller after they have provided their username and password. All user information is then stored in the JWT token. Subsequent requests contain the token, which is used to authenticate and authorize the user.
What approach to use?
Both approaches have their own advantages and disadvantages. Approach 1 is more secure and provides a complete user management system, but it requires more setup and maintenance. And it also requires storing user data in a database. On the other hand, Approach 2 is simpler to implement and does not require a database, but it is less secure as it stores all user information in the JWT token.
In general, it is recommended to use Approach 1 for more secure applications that require a complete user management system, and Approach 2 for simpler applications that do not require a full user management system. both approaches use JWT token authentication. Neither of them follow OAuth directly.
The names of these two approaches are not standardized and may vary, but they can be referred to as “Identity-based JWT authentication” (Approach 1) and “JWT token-based authentication” (Approach 2).
Then what is OAuth?
OAuth is a separate authentication and authorization framework that provides a secure way for users to grant third-party applications access to their resources without revealing their credentials. JWT token-based authentication can be used in conjunction with OAuth, but they are not the same thing. Approach 1, which uses ASP.NET Core Identity, can also be used with OAuth to provide a complete user management and authorization solution.
“Identity-based JWT authentication” (Approach 1) and “JWT token-based authentication” (Approach 2) differ in their internal working mechanisms as follows:
- Identity-based JWT authentication (Approach 1): In this approach, the ASP.NET Core Identity framework is used to manage users and their roles. The UserManager and RoleManager classes are used to create and manage users and roles, and the UserManager<ApplicationUser> class is used to manage user claims, logins, and other information. This information is stored in the database, and is used to generate JWT tokens when a user logs in.
- JWT token-based authentication (Approach 2): In this approach, JWT tokens are generated directly when a user logs in, without using the ASP.NET Core Identity framework. When a user posts their username and password, a JWT token is created and sent to the caller. This token contains the necessary information to authenticate subsequent API requests. The API retrieves the necessary information from the JWT token in subsequent calls, without using the database or the UserManager and RoleManager classes.
Benifits of Identity Based JWT approach
The benefits of storing user claims, logins, and other information in a database in the “Identity-based JWT authentication” (Approach 1) approach are:
- Persistence: Storing information in a database ensures that the information is persisted across application restarts and can be retrieved when needed, such as when a user logs in.
- Scalability: Storing information in a database allows for easy scaling, as multiple instances of the application can access the same database and share user information.
- Centralized Management: Storing information in a database allows for centralized management of user information, making it easier to manage users, roles, and permissions in a single place.
- Data Management: Storing information in a database allows for easy management of user data, including backup, restoration, and data analytics.
The downside of this approach is that it requires more setup and maintenance, as the database, database tables, and the ASP.NET Core Identity framework must be properly configured and maintained. Additionally, retrieving user information from the database can add latency to API requests, as the API must make a database call to retrieve the information.
What I have done…
We will now try the second approach as we don’t need DotNet Core Identity for the time being. The tutorial we are going to follow now is – https://www.c-sharpcorner.com/article/jwt-token-creation-authentication-and-authorization-in-asp-net-core-6-0-with-po/
I have added one extra property to User model, “password”.
To enable authentication in swagger; added the following lines in program.cs –
builder.Services.AddSwaggerGen(option =>
{
    option.SwaggerDoc("v1", new OpenApiInfo { Title = "Demo API", Version = "v1" });
    option.AddSecurityDefinition("Bearer", new OpenApiSecurityScheme
    {
        In = ParameterLocation.Header,
        Description = "Please enter a valid token",
        Name = "Authorization",
        Type = SecuritySchemeType.Http,
        BearerFormat = "JWT",
        Scheme = "Bearer"
    });
    option.AddSecurityRequirement(new OpenApiSecurityRequirement
    {
        {
            new OpenApiSecurityScheme
            {
                Reference = new OpenApiReference
                {
                    Type=ReferenceType.SecurityScheme,
                    Id="Bearer"
                }
            },
            new string[]{}
        }
    });
})
And to add authentication to the project; added following lines in program.cs-
builder.Services.AddAuthentication(JwtBearerDefaults.AuthenticationScheme).AddJwtBearer(options =>
{
    options.TokenValidationParameters = new TokenValidationParameters
    {
        ValidateIssuer = true,
        ValidateAudience = true,
        ValidateLifetime = true,
        ValidateIssuerSigningKey = true,
        ValidIssuer = builder.Configuration["Jwt:Issuer"],
        ValidAudience = builder.Configuration["Jwt:Audience"],
        IssuerSigningKey = new SymmetricSecurityKey(Encoding.UTF8.GetBytes(builder.Configuration["Jwt:Key"]))
    };
});
For the rest of the things; we more or less followed the given tutorial (we didn’t add UserLogin, UserModel and UserConstant) and used existing User model for everything (with password field added).
When we run the project; we can see that things are working perfectly fine and as expected.
Next up; we will fix the issue that whenever an exception is thrown from database during entry save; the next time it saves successfully; it skips an index.
To avoid skipping an index when an exception is thrown during database entry save, you can wrap the code inside a transaction using the using statement with the TransactionScope class. If an exception occurs, you can catch it and call TransactionScope.Current.SetAborted() to abort the transaction and roll back the changes. The user save code from Repository is as follows –
using (var transaction = new TransactionScope())
{
    try
    {
        _databaseContext.Add<User>(user);
        _databaseContext.SaveChanges();
        transaction.Complete();
    }
    catch (Exception)
    {
        transaction.Current.SetAborted();
        throw;
    }
}
That’s it for the fourth episode of this series and version_3 of code. In version_4; we will separate Entity and DTO classes and incorporate code first approach.